Thursday, April 25, 2013

what's cooking carson?

I'm back with more about Carson's new kitchen.  I'm thrilled to report that he still finds it VERY entertaining.  He's been cooking up all sorts of good stuff (love that watermelon and bread stew).

In my previous post I gave you a peek at what I "renovated" on his little Ikea kitchen and here I'll start to go into the details.

I'll start with his "new appliances".

I painted the stove and microwave to look like stainless steel.  The goal was to make it look like the real thing.

I used Rustoleum Primer, followed by Rustoleum metallic spray paint for the microwave and oven.  I taped off the glass on both sides, gave it a quick sanding with 200 grit sand paper, and gave it a few coats.  I sealed it with clear enamel to keep it from scratching.
I painted a black rim on the glass with a paint brush and some black epoxy appliance paint we had in the garage.  I swapped out the handles for some satin nickel drawer pulls from Lowes.   Any 5" drawer pulls will fit perfectly.
I added oven knobs using some $0.99 knobs and a $0.29 wooden picket fence piece that I found at Michaels.  I cut the picket fence to make little arrows (easy to cut using scissors) and sanded them a bit so they were nice and smooth.  I then turned over the knobs so I was using the flat (wrong) side.  I inserted a screw with a dab of super glue so it would be stuck in place, and then super glued the arrows onto the screw and knob.  I painted the whole thing with the metallic spray paint and enamel mentioned above.  I drilled holes and put the knobs right above the oven using little nuts.  I didn't tighten the nuts all the way so the knobs can move like real oven knobs.
I also replaced the Ikea shelf with a metal oven rack using an extra piece of this shelving system that we had in the garage and some bolt cutters.
Of course now that the oven looks like the real thing, it has to open like the real thing.  I attached new hinges so it opens down instead of to the side.  I found the perfect hinge solution here.  I also added an oven light (he's got to be able to see if those cookies are rising!).
The microwave has a turntable that really spins.  It's made with a cd (painted with the same metallic paint and enamel).  It has a metal washer super glued to the underside.  It's attached with a bolt (also painted to match) that I cut really short with my bolt cutters.  I drilled a shallow hole (NOT all the way through) and used gorilla glue to keep the bolt in place.  So far it's holding strong and it's been getting plenty of use!
I'm off to enjoy some play dough cookies!

I've got one more post to come on the cosmetic details of the kid's kitchen remodel.

Wednesday, April 24, 2013

32 years...

I'm a year older today and I'm feeling pretty good about it.  I've spent the day enjoying some of life's simple pleasures (a perfect cup of coffee, the park with a happy toddler and a nice workout).

I got the loveliest surprise this morning when my sweet pea's first bloom opened up.  It smells so good!

I hope April 24th is treating everyone sweetly!


Monday, April 22, 2013

happy earth day

As an Oregon native (and a farm girl at heart) it's only right that I celebrate earth day.  And of course, when I decide to celebrate, the whole family gets to celebrate.

And celebrate we did... by planting our raised bed!

We'll soon be feasting on:
lettuce (a few different kinds)
red kale
cilantro
corn (white & yellow)
sweet bell peppers (red & green)
eggplant
cucumber
yellow heirloom tomatoes
sweet black cherry tomatoes
cilantro
and pole beans
(+ you'll spot some marigolds and rue in there to keep the bugs in check!)


We've also got raspberries, blueberries, strawberries, basil, garlic, thyme, parsley and chives scattered throughout the yard.  There's still some space in the left in the raised bed too!

Last year I started all my plants from seed, but I'm impatient (and unorganized) this year and it just took too long.  I figured it would be more fun (especially with a toddler as my assistant) to start from seedlings this year.  We went with plants from the Organiks line that's sold at Armstrong.  It's surprisingly hard to find organic vegetable plants.  It seems like if your growing your own they sure ought to be organic!  So, if you're looking for organic plants I'd recommend Armstrong.  If it's seeds you're after I love Annie's Heirlooms.

Yum.  Can't wait for harvest time.  Look forward to some recipes!

Happy Earth Day.

Tuesday, April 16, 2013

kiddo kitchen remodel

Who would've thought I'd be DIY'ing two kitchen remodels in less than 3 years?  I must admit, this one was quite a bit easier than the big kitchen!

It was high time for Carson to have his OWN kitchen.  I was tired of him trashing MY kitchen every time I tried to cook a meal.  He's such a great little helper, but somehow his "help" creates a lot more work for me!
He's very into pretending, so I was fairly certain that a play kitchen would be a big hit.

I'd been debating whether or not to purchase a play kitchen for the past few weeks.  I just love the retro kitchens from PB Kids and KidKraft, but I was holding back because they're spendy and we didn't really have an occasion to celebrate (we ended up cheating and giving him the kitchen for his 1/2 birthday).

Anyway, all my kid's kitchen research went out the window during my most recent trip to Ikea.  I just couldn't resist when I found a little Duktig kitchen in the "AS IS" section for $44. Like most things Ikea, their little kitchen is simple but cute as is, but with a little extra it can be REALLY cute.  My "as is" find was scratched up (and missing some screws) so I took that as my opportunity to get started on a little remodel!

Here is the original Ikea Duktig kids kitchen...
 And here is my remodeled version...
I used paint, hardware and tile leftover from our "real" kitchen remodel to keep the cost down and make it fit in with the real thing!

I'd say the project was a success.  I think our budding chef would definitely agree!  He's becoming quite the expert at whipping up a batch of play dough cookies.

More to come on exactly how I "renovated" this little kitchen later this week.
 

Sunday, April 14, 2013

hap birt

Our little guy is 1 and a 1/2 years old!  These have been unquestionably the best 18 months of my life.  Carson is my best buddy (along with Jeff and Jake).  He gets more fun by the day.  We've experienced so much joy and laughter (and a few tears too) throughout the past 18 months.  It's hard to remember what life was like without him.  I do remember that it involved a lot more sleeping in and a much cleaner house, but I certainly wouldn't trade a day!

Anyway, growing up we celebrated 1/2 birthdays.  It's a tradition that I love and remember so fondly.  I mean, a year is just too long to wait when you're only 547.5 days old.

So...

HAP BIRT CAR!


I made him a layer cake in his favorite colors (blue and green), with whip cream frosting.
It's a half cake, of course!


Here's the recipe for the colorful layer cake (thanks Martha Stewart)!
Ingredients
  • 3 cups all-purpose flour
  • 4 teaspoons baking powder
  • 1/2 teaspoon salt
  • 2 sticks (1 cup) unsalted butter, room temperature
  • 2 1/3 cups sugar
  • 5 large egg whites, room temperature
  • 2 teaspoons pure vanilla extract
  • 1 1/2 cups milk, room temperature
  • Gel food coloring in whatever colors you choose (I went with royal blue and teal)
Directions
  1. Preheat oven to 350 degrees. Brush your 9-inch-round cake pans with butter.  The number of pans you'll need will depend on how many layers you'd like.  I only needed two pans since I was making a four layer 1/2 cake.  I cut each pan in half!  Line the bottom of each cake pan with parchment paper; brush again and set aside.
  2. In a large bowl, whisk together flour, baking powder and salt; set aside. In the bowl of an electric mixer fitted with the paddle attachment, cream together butter and sugar. Slowly add egg whites and mix until well combined. Add vanilla and mix until fully incorporated. Add flour mixture and milk in two alternating additions, beginning with the flour and ending with the milk. Mix until well combined.
  3. Divide batter evenly between two medium bowls (use a bowl for each colored layer). Add food coloring to each bowl, whisking, until desired shade is reached. Transfer each color to an individual cake pan. Transfer to oven and bake until a toothpick inserted into the center of each cake comes out clean, about 15 minutes.
  4. Remove cakes from oven and transfer to a wire rack.  Let cool for 10 minutes.  Invert cakes onto a wire rack and let cool completely.
  5. Using a serrated knife, trim tops of cakes to make level.  Use a plate/cake stand or lazy susan to decorate your cake.  Place the first layer on the stand and top with desired frosting (see below for the whip cream frosting that I used. Use an offset spatula so it extends just beyond edges. Repeat process with all layers (or half layers if you're celebrating a half bday!).
  6. Place the final layer on top, bottom-side up. Gently sweep away any loose crumbs with a pastry brush. Using an offset spatula, cover the top and sides with a very thin layer of frosting (also use any of the excess frosting visible between the layers). Refrigerate until set, about 30 minutes.
  7. Using an offset spatula, cover cake again with remaining frosting.
Cool Whip Frosting 
(SO delicious - not too sweet)
Ingredients
  • 1 cup milk
  • 1/4 cup powdered sugar
  • 1 small box vanilla pudding
  • 8 oz cool whip

Beat together milk, sugar and vanilla pudding for 2 minutes.  Fold in cool whip until completely combined.

ENJOY!  We sure did!

Monday, April 8, 2013

perfect porch accessories

Our front porch is finally as cozy and inviting as can be!  We found the perfect front porch furniture and spent less than $100 total.  Of course, to me, perfect means pre-loved, antique and full of charm!  

On one side of the porch we've got a little bistro set.  It's the perfect size for a cup of coffee and the morning paper.  I've got to thank IKEA for this one - that place sure can come through for you when you're on a budget!  
TÄRNÖ Bistro set IKEA You can easily protect your furniture against wear and tear by re-glazing it on a regular basis, about once a year.

I gave it a new coat of paint to match the front door (and the black back door - not pictured). 


 Behind the bistro set is my new hydrangea.  I can't wait for it to get nice and tall and create a more enclosed feel.  It's a Penny Mac Repeat Bloomer - it was a splurge from Armstrong Gardens, but they're SO worth it.  We'll get lovely blue flowers ALL summer!

 On the other side of the porch, I've got my new porch swing.  It was quite the find from one of my favorite Long Beach salvage shops.  I needed a pretty narrow swing and this one is just perfect.
I bought it for a steal looking like this...
gave it a nice "milk paint" makeover, added some Costco outdoor pillows and here's the finished product.  I just LOVE milk paint.  If you haven't used it (and like to paint furniture) you just MUST try it.  It deserves it's own post soon!
Our little porch is finished off with this cottage fence that Jeff and I built using 2"x2"s and 2"x4"s.  There's a great lumber yard next to one of the schools that I work with and they milled the 2"x2"s into points for me (and gave Carson a ride on the forklift)!


Friday, April 5, 2013

painting myself a "brick" porch

I've always loved the idea of a front porch.  I can just imagine a lazy afternoon spent sipping lemonade on my porch swing.  I do, however, have a spunky little toddler, so I'll settle for 30 seconds on the swing, 5 minutes playing ball, 5 minutes digging in the dirt and 5 minutes chasing the dog.   And we'll put the lemonade in a sippy cup.  Still sounds perfect to me!

Anyway, we're lucky enough to have a (little) front porch, but it just wasn't a relaxing place to be, so we never spent any time out there.  Here's a before pic.  Or check out this post for a WAY before pic.

We set out to create a space where we could sit and relax.  We live on a quiet street and it's fun to just watch the world go by.  First on my to-do list was to get rid of the boring concrete.  Our house has a lot of brick accents (which I love) so that was the logical choice.  But, we couldn't use real bricks because they would have added too much height to the porch.  I did find a great product called Thin Bricks, but we weren't willing to shell out the big bucks for this project.  We also explored faux brick panels (yuck) and some different tile options, but in the end they were all too spendy or just not what we envisioned.

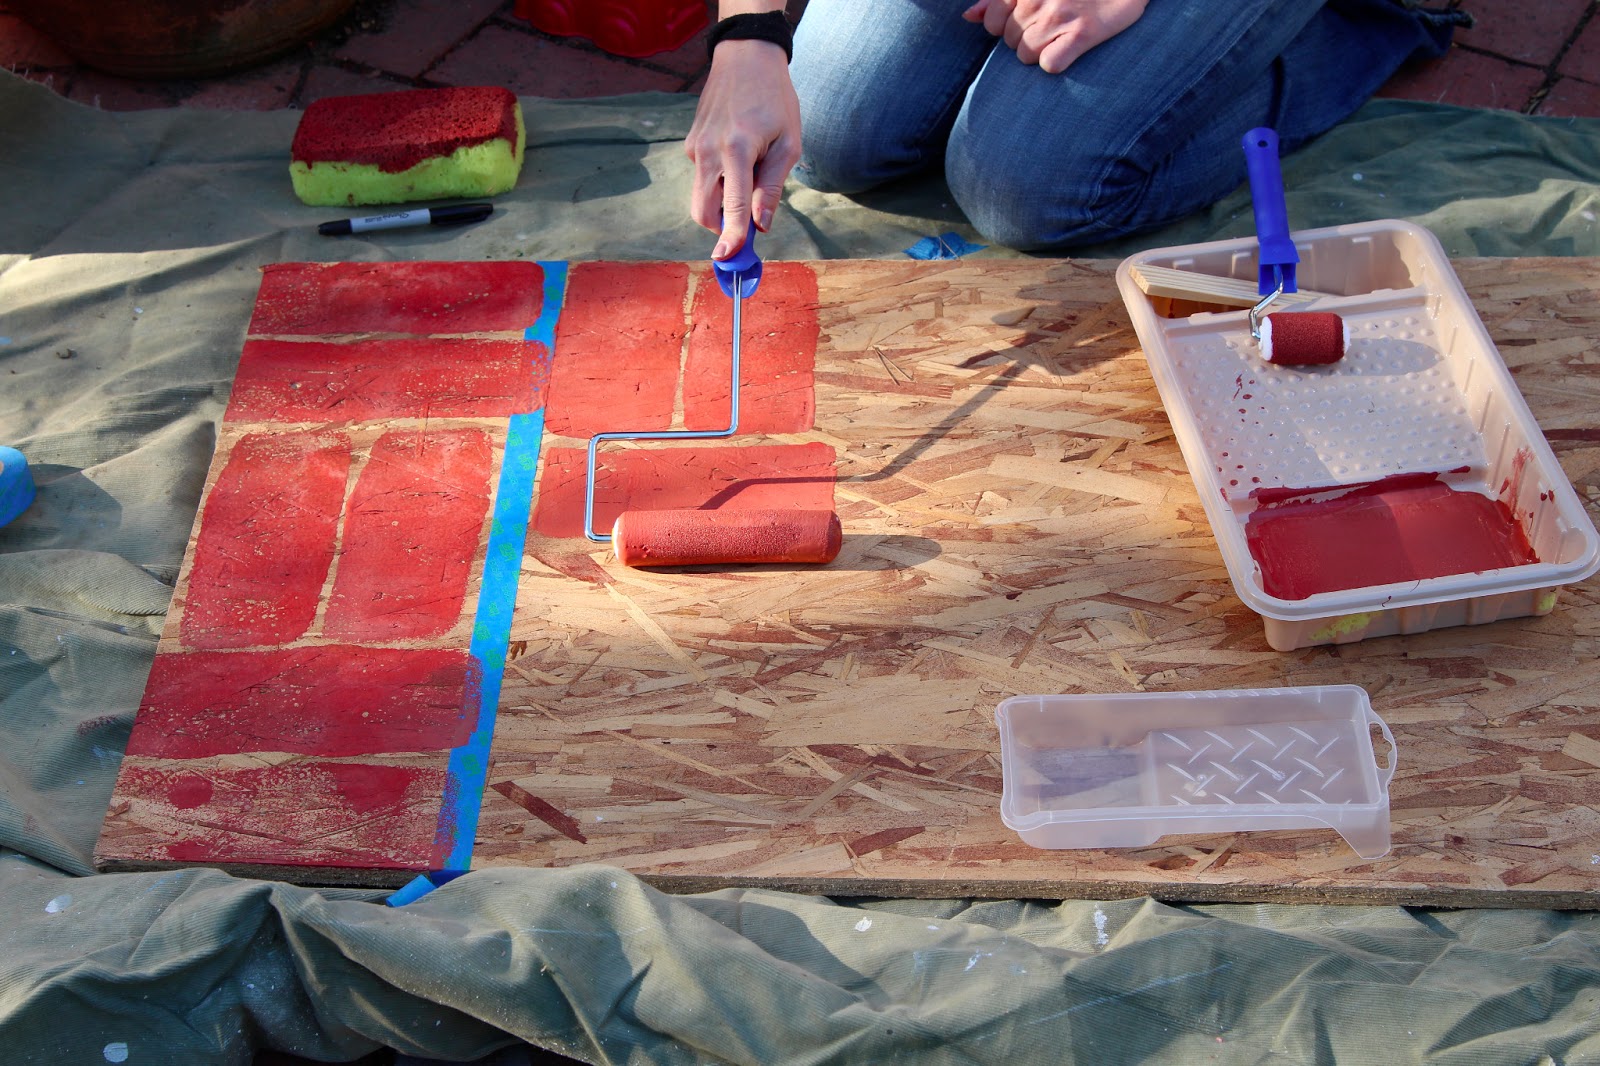
So, I decided to get out my paintin' gear and get to work.  I bought 4 different shades of red concrete paint, some foam rollers and a 1" angled brush.  I already had plenty of paint trays and painters tape, so I was ready to get started.

I painted some practice bricks on a piece of plywood.  I tried using a sponge as a stencil, painting with the brush, painting with a normal 3" roller and painting with a 6" foam roller.  I decided that a combination of the brush and the 6" foam roller gave me the best outcome, so I grabbed those tools and got to work.
First, I prepped the concrete using this etching solution.  I can't say I really know what etching solution does, but apparently it helps the paint adhere, so I figured it was worth a little extra time.

Next, I measured my space and planned my brick layout (I decided on a basket weave design).  A normal brick is 4"x8" so I measured out an 8.5" wide strip across the concrete and put down a piece of painter's tape.  The tape was just to keep the bricks relatively straight, I did all of the bricks freehand.  I thought they would look more realistic if they weren't perfect (honestly, I really didn't want to take the time to tape them all off)!
I had four different trays of red paint (colors listed below) and two different rollers.  I didn't follow a pattern.  I just painted whatever color red I wanted, wherever I wanted it.  The more I painted, the more the colors mixed together (since I was only using two rollers in four trays of paint), but that just adds to the imperfect brick-like charm.
Here's my set up and my "boss" keeping me on (off) task.


 Here it is a few days into the project. 
And here I am finishing the last couple of bricks!  It took me a total of 6 days, but I only worked on it during naptimes (about 2 hours/day).
I couldn't be happier with the way it turned out.  You really can't tell the difference between the real and the painted bricks unless you're standing on them!


Here is my materials list in case you've got some concrete that needs a makeover!
  • Etching Solution (I used this one because it's biodegradable)
  • A stiff bristled brush (to scrub the etching solution)
  • Foam paint rollers (usually called cabinet rollers)
  • a 1" angled paint brush (I always use Purdy brushes)
  • Paint trays (disposable liners are handy if you'll be doing this over the course of many days, like I did)
  • Red concrete paint (I used tintable Valspar porch and floor paint) in a few different red shades.
    • Valspar Molera Vaquero Red
    • Valspar Tropical Nut
    • Valspar La Fonda Antique Red
    • Valspar Hubbel House Pajarito Red 
  • A concrete sealer/waterproofer.  I haven't done this yet, but I need to this weekend! 
Next up,  front porch details:
Our "new" salvage yard swing, picket fence and super affordable bistro furniture!

Have a great weekend.  I'm hoping ours involves pancakes on the porch!